Organization profile and standards
Set the company details, the working week, factories, the standards your organization works to and the rules for signing and release.
This page is for the Org admin (Grace Ooi). Other roles with Settings access can read these screens, but only the Org admin can change them.
Open Settings > Organization. The tab bar across the top of Settings has Organization, Shifts & schedule, Users & invitations, Roles & permissions, Entities & access and All master data.
Organization settings on desktop
The company header, the On this page list and the numbered sections.
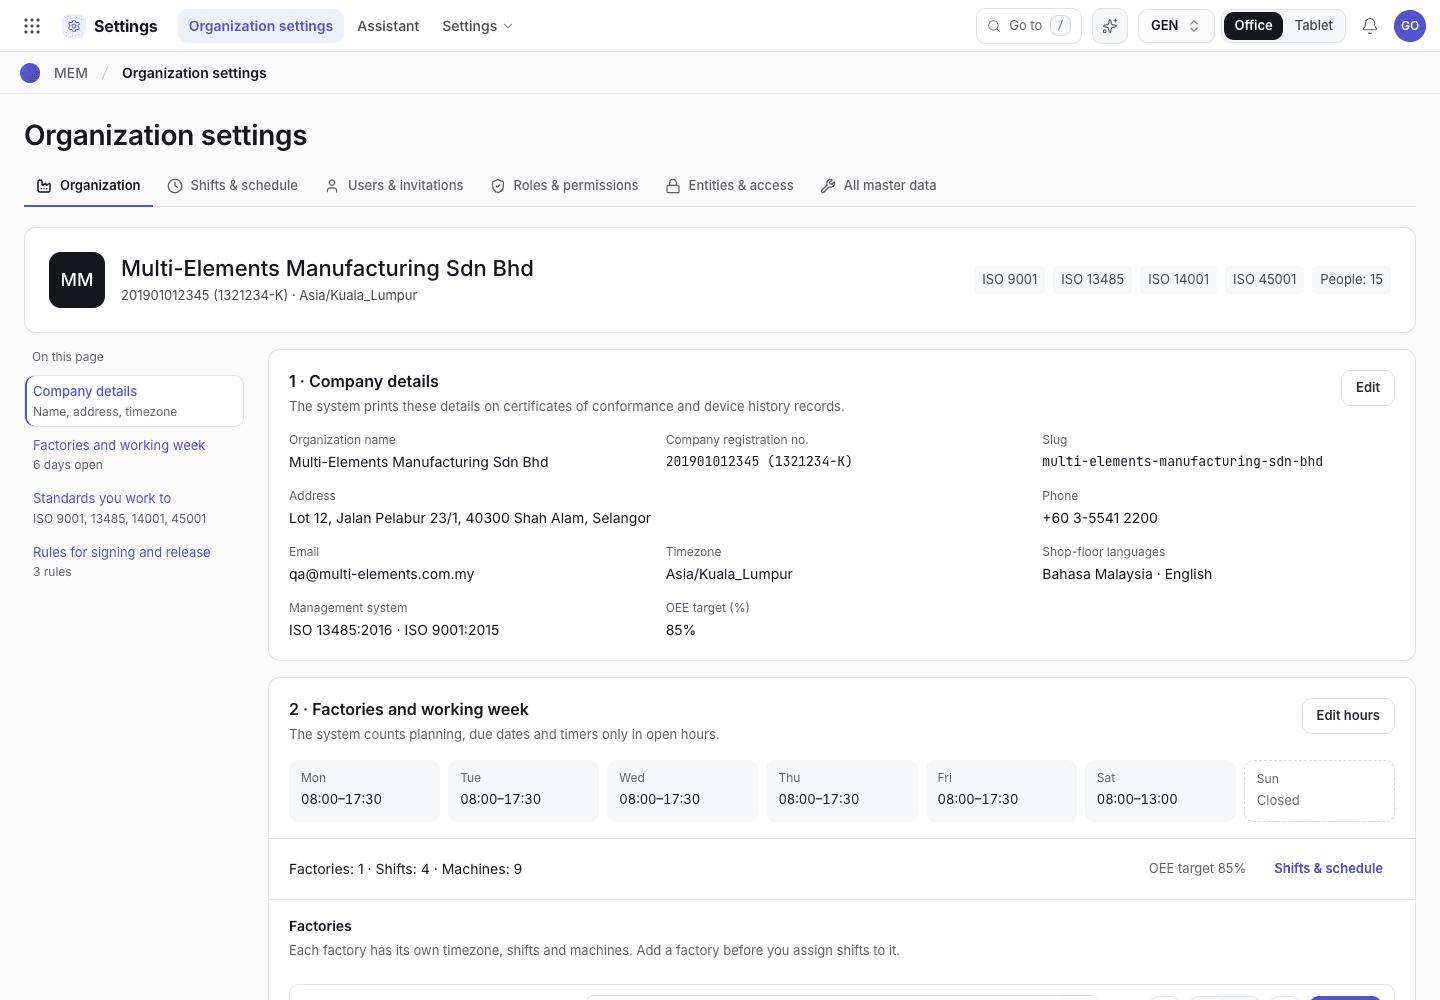
- Settings tabs: Organization, Shifts & schedule, Users & invitations and more.
- Company header: name, registration, timezone and a badge for each standard that is on.
- On this page: choose a name to jump to that section.
- Edit opens the company form.
- Company details: a read-only list.
- Working week: a closed day has a dashed border.
Organization settings on a phone
The same sections stacked in one column.
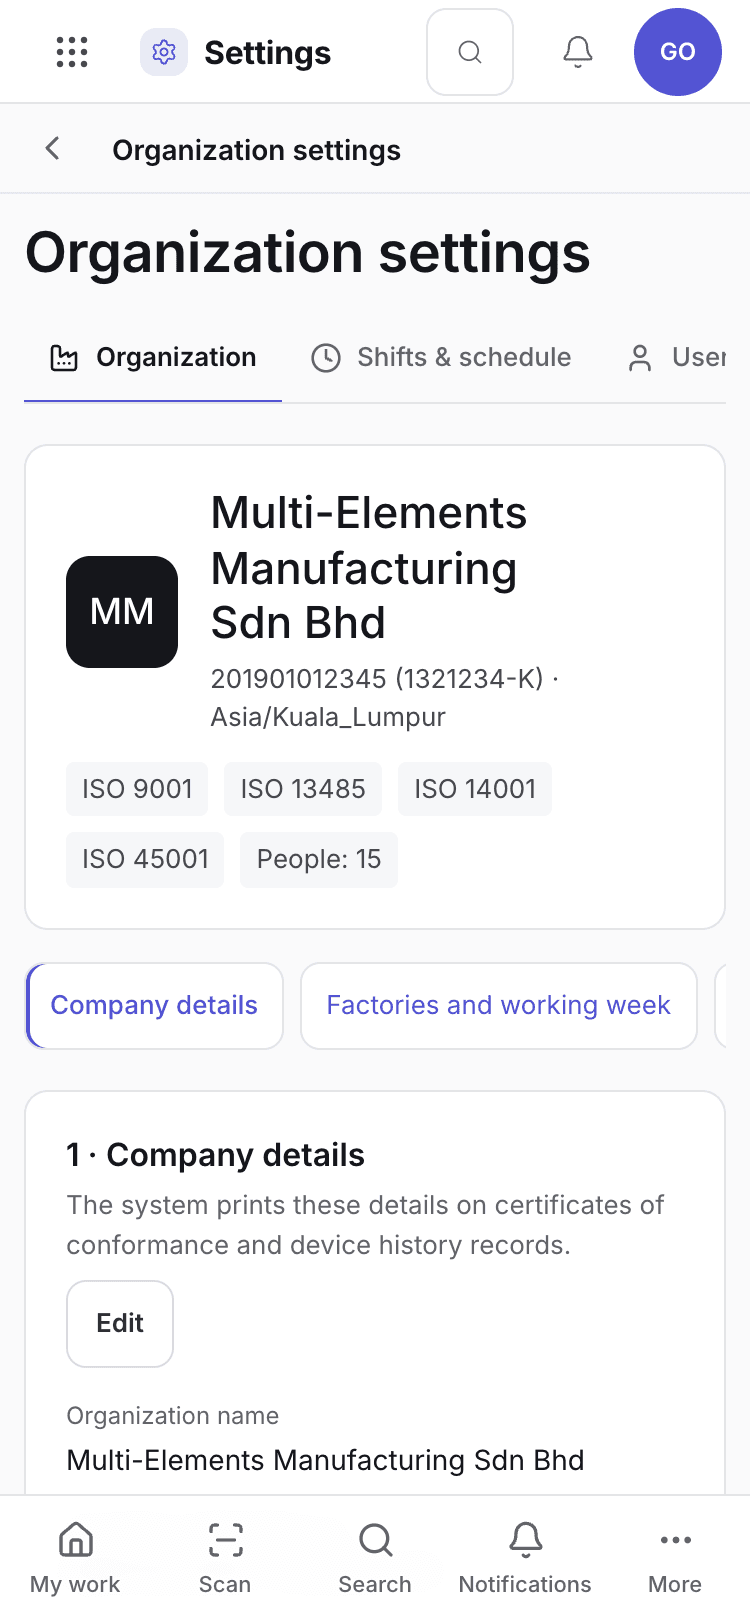
- Settings tabs scroll sideways.
- Company header with the standards that are on.
- On this page: a row of chips. Scroll it sideways.
- Edit.
The page has five numbered sections. The On this page list at the left (a row of chips on a phone) jumps to each one:
- Company details
- Factories and working week
- Standards you work to
- Modules: see Modules and your package
- Rules for signing and release
At the top, the company header shows the initials, the legal name, the registration number and the timezone. A badge shows each standard that is on and the number of people.
Change the company details
These appear on certificates of conformance and device history records.
Under 1 · Company details, read the list: Organization name, Company registration no., Slug, Address, Phone, Email, Timezone, Shop-floor languages, Management system and OEE target (%). Slug is used in sign-in links and only Xentr support can change it.
Choose Edit. In the dialog, change the fields you need. OEE target (%) is a number up to 100.
Management system is free text, for example ISO 13485:2016.
Choose Save changes. The message Organization saved appears.
Set the letterhead and logo
The letterhead is the top and the foot of the documents that you print: certificates of conformance, controlled copies of records, job travellers, device history records, first article reports and the quality manual. Each organization has its own letterhead. Open Sales > Settings > Document layout. A role with full access to Settings (by default the Org admin) can change it. Other roles can only read it.
Edit Company name, Tagline / certifications, Address, Phone and email, Registration and tax no. and Footer text. The preview on the right shows a quotation with the letterhead.
Under Logo image, choose Upload logo and pick a PNG, JPEG or WebP file. The app makes the image smaller to fit the letterhead. To go back to the coloured badge with the Logo initials, choose Remove logo.
Document layout with a logo image
The logo image replaces the badge in the preview and on every printed document.
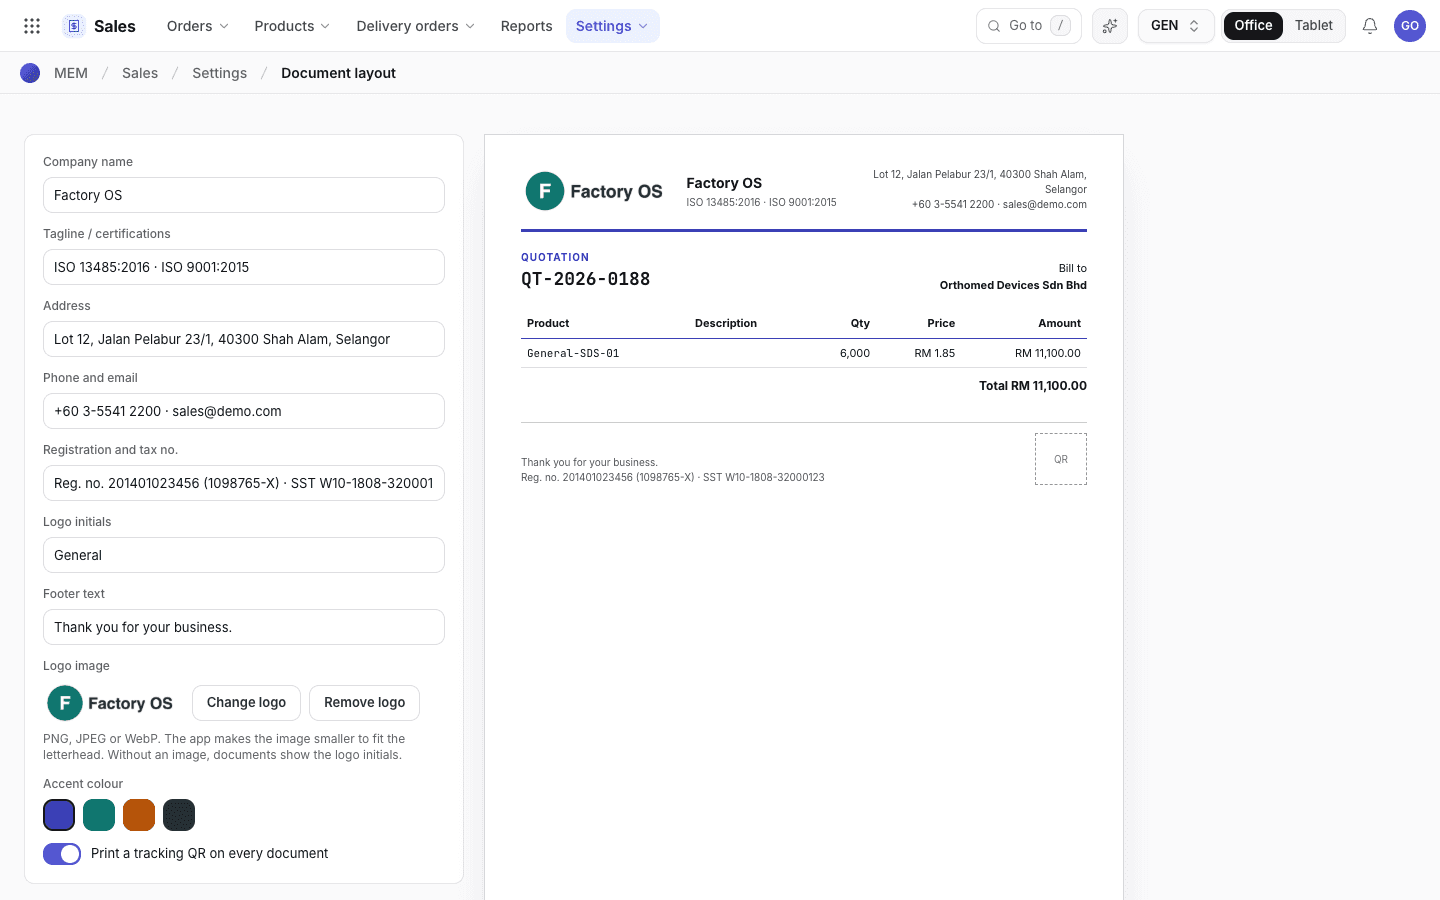
- Logo image with Change logo and Remove logo.
- The logo in the preview.
- Footer text and registration line.
Document layout on a phone
The same screen at 375 px.
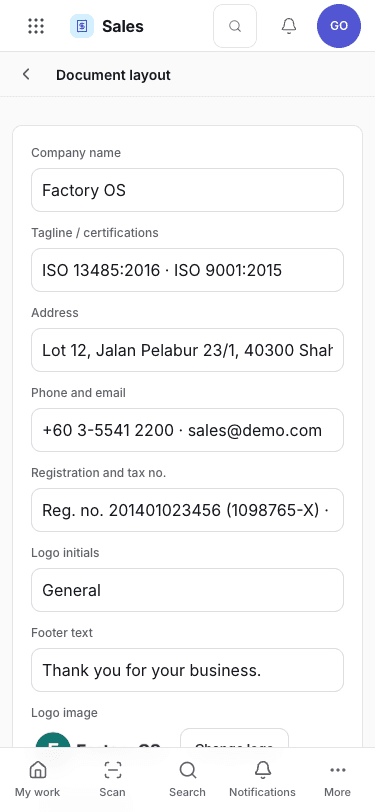
- Company fields.
Pick an Accent colour and choose whether to Print a tracking QR on every document. Choose
Save. The message Document layout saved appears, and the audit trail records the change. The
next print uses the new letterhead.
A printed document with the letterhead
The certificate of conformance of DO-2026-0318 with the logo, the company details and the footer.
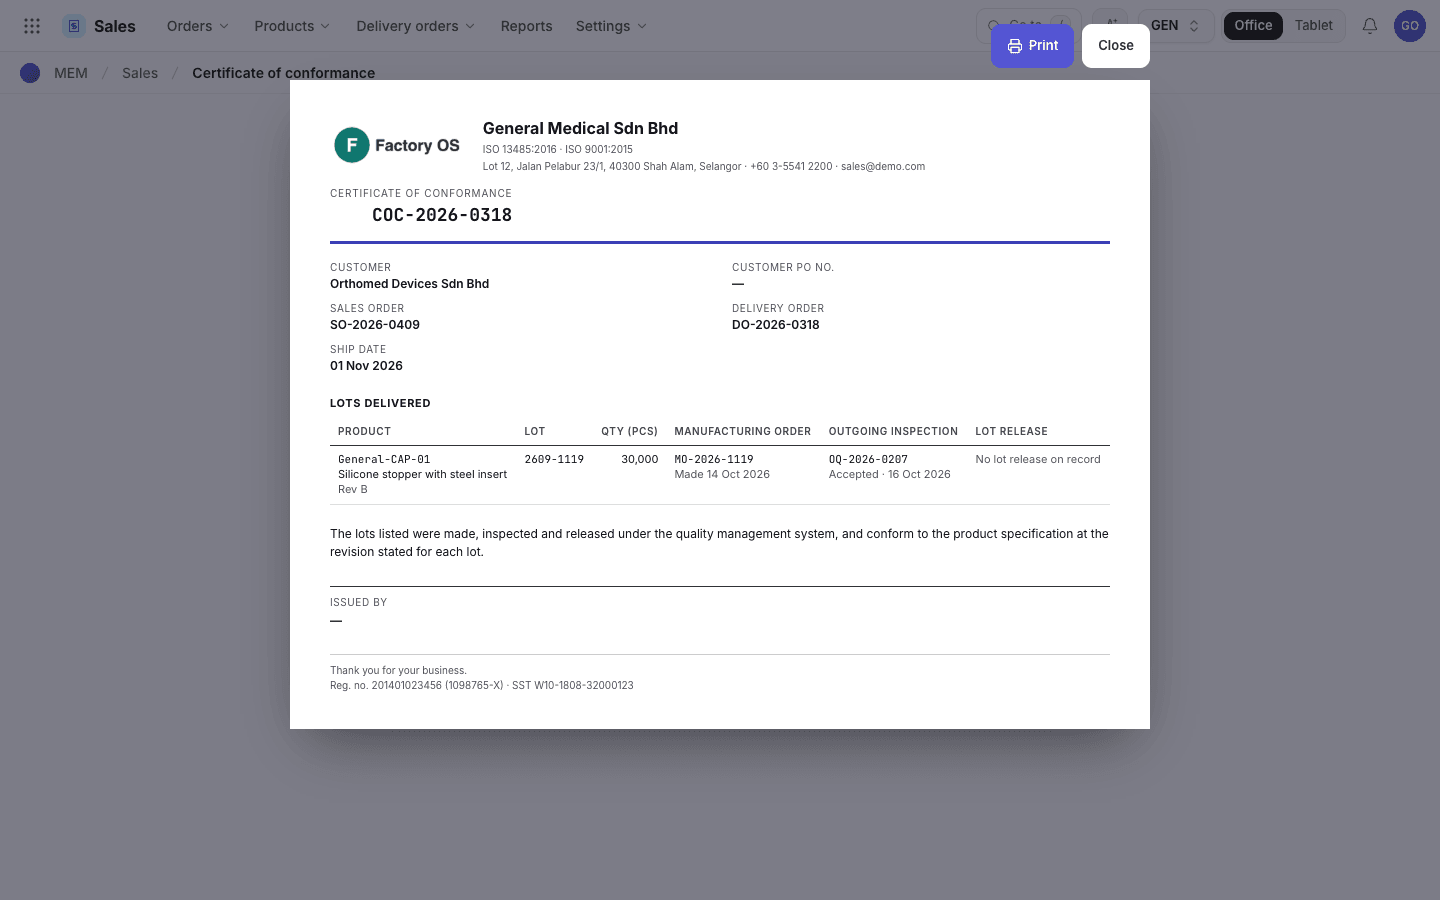
- Logo and company details.
- Footer text and registration line.
A certificate of conformance shows the name of the legal entity that shipped the goods, when the delivery order has one. The logo and the other details come from the letterhead.
Set the operating hours
Under 2 · Factories and working week, seven tiles show the days with their open hours. A closed day has a dashed border. Below them, a line gives the number of factories, shifts and machines and the OEE target. Shifts & schedule opens the shifts screen.
Choose Edit hours. In the dialog, switch each day Open or Closed and set From and To.
Planning, due dates and acknowledgement timers count against this time. Choose Save changes. The
message reads Operating hours saved. Details of shifts and planned downtime are in
Shifts, working hours and planned downtime.
Switch management system standards
Under 3 · Standards you work to, ISO 9001:2015 is the base standard and is Always on. The other three have a switch:
| Standard | What it adds |
|---|---|
| ISO 13485:2016 | The medical device requirements, listed as features below it. |
| ISO 14001:2015 | EHS environment: aspects and impacts, environmental monitoring, waste consignments. |
| ISO 45001:2018 | EHS safety: hazard risk assessment, incidents and near misses, permits to work, inspections, worker consultation. |
While ISO 13485 is on, six tiles show what it adds: Device history records, Advisory notices and recalls, Complaint reportability, Software validation, Retention samples and Clause references. They are part of the standard. Each reads On while ISO 13485 is on, and they are hidden when you switch ISO 13485 off. Clause references shows ISO 13485 numbers in the clause badges. When ISO 13485 is off, clause badges show the ISO 9001 equivalent.
When you switch a standard off, the app asks Switch off {name}?. Confirming hides its pages, clause badges
and gates for everyone in the organization. Existing records are kept and come back when you switch it on
again. The change is written to the audit trail (ISO 13485 clause 4.1).
Sign without a linked employee
By default, each signed step needs a login with a linked, active employee who has current training (ISO 13485 clause 6.2). A workspace that does not keep employee records can turn this check off. The Org admin makes the change. It needs a reason and your e-signature.
Rules for signing and release
Each rule with its current value and a Change button.
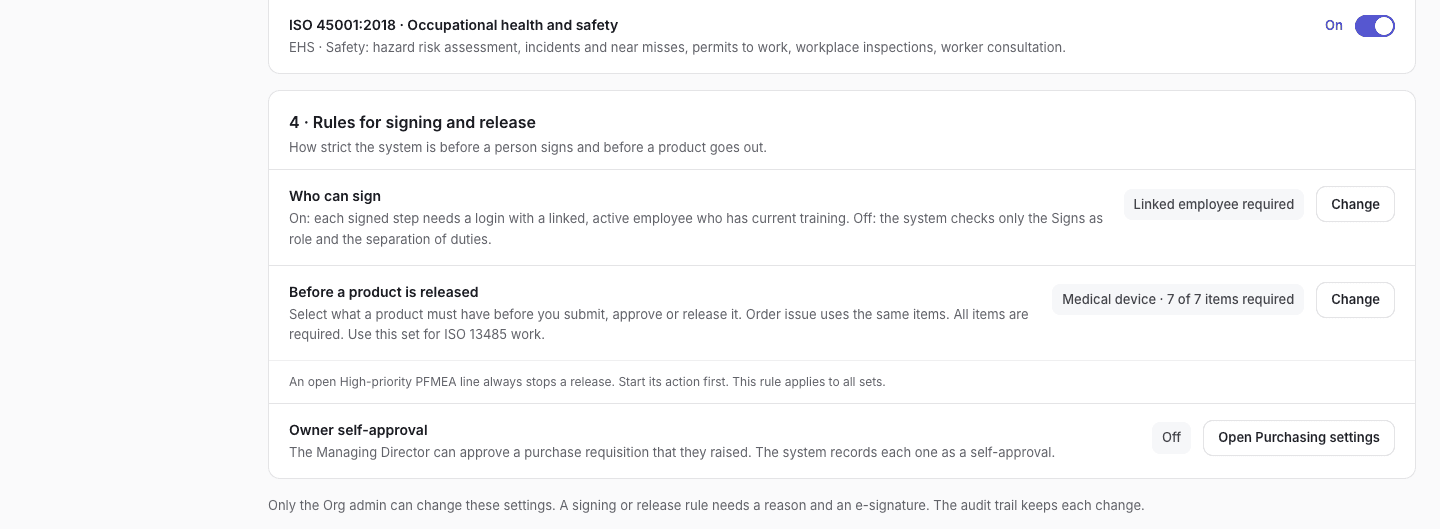
- Who can sign: Linked employee required is on by default.
- Change opens a dialog. Only the Org admin can use it.
- Before a product is released: the set and how many items.
- Owner self-approval: its switch is in Purchasing settings.
Under 4 · Rules for signing and release, find the row Who can sign. Its value reads Linked employee required while the check is on. Choose Change.
Read the dialog. If the workspace uses ISO 13485, a warning tells you that clause 6.2 requires trained personnel to do and sign the work.
Type the Reason for the change (4 characters or more). Then choose Sign · turn off.
Turn off the check
The reason, the ISO 13485 warning and your signature.
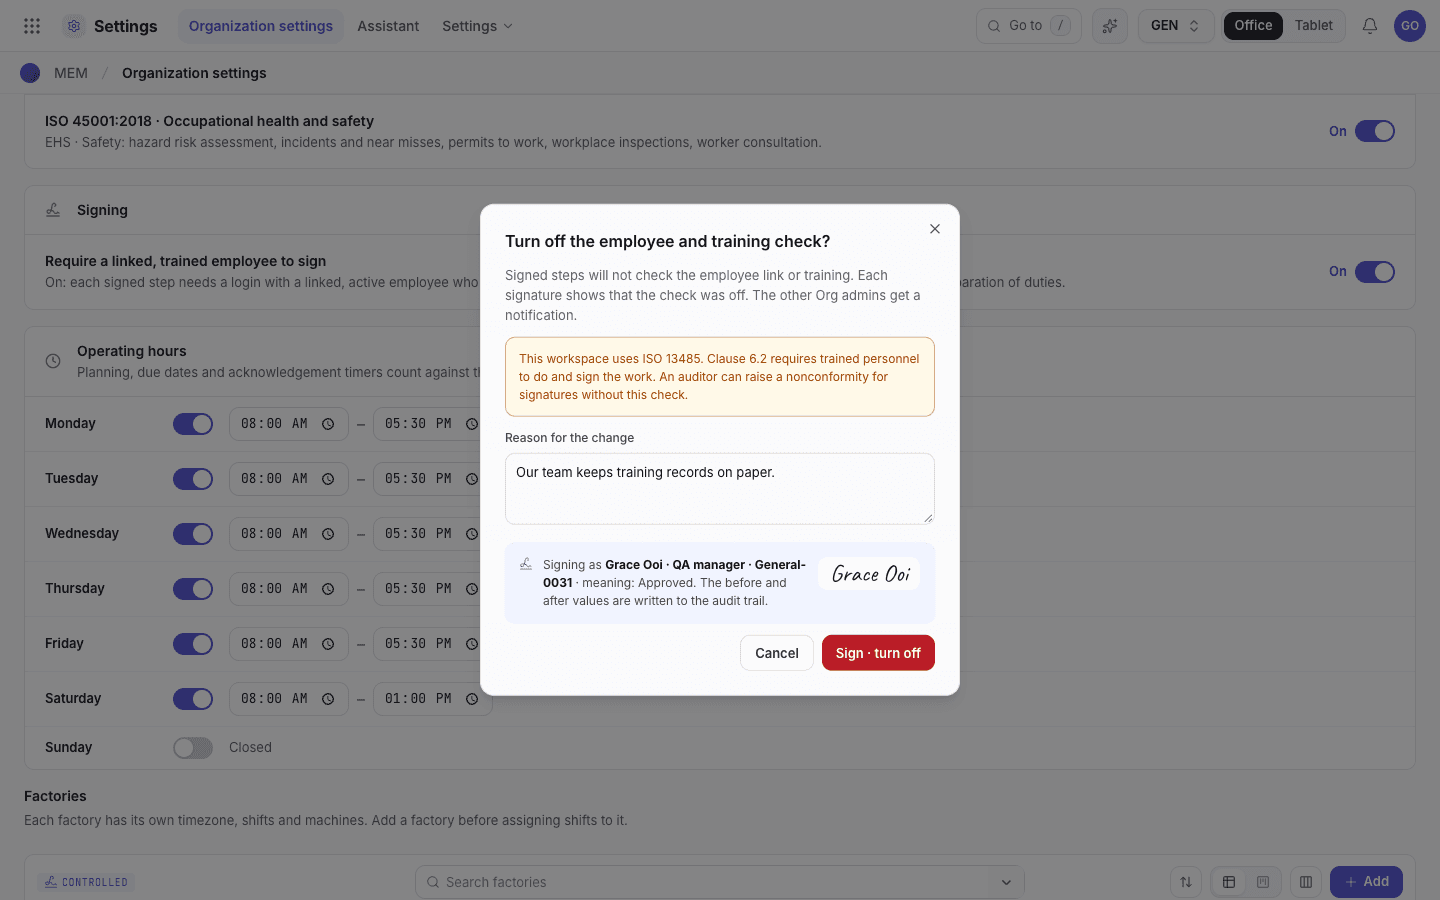
- ISO 13485 warning: shown when the workspace uses ISO 13485.
- Reason for the change.
- Your signature.
- Sign · turn off.
The same dialog on a phone
The dialog fills the width of the screen.
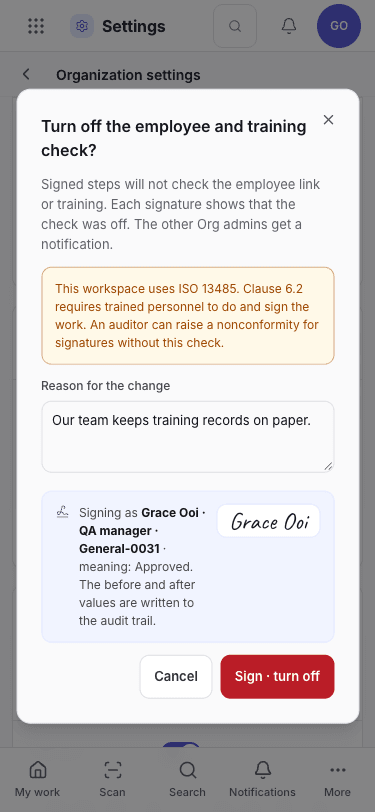
- ISO 13485 warning.
- Sign · turn off.
When the check is off:
- A signed step does not check the employee link or the training of the person who signs.
- Each login still needs a Signs as role, and the role must have the authority for the step.
- The "someone other than" rules stay. When a login has no employee, the system compares logins. For example, the login that reported an incident cannot close it.
- Each signature shows
training check off for this workspacein the record history and the audit trail. - You can link an employee to a login that has none, but you cannot remove or change a link. Turn the check on first.
- The other Org admins get a notification. The audit trail keeps the old and the new value, the reason and the signature.
The change in the audit trail
Each change of the rule, with the reason and the signature.
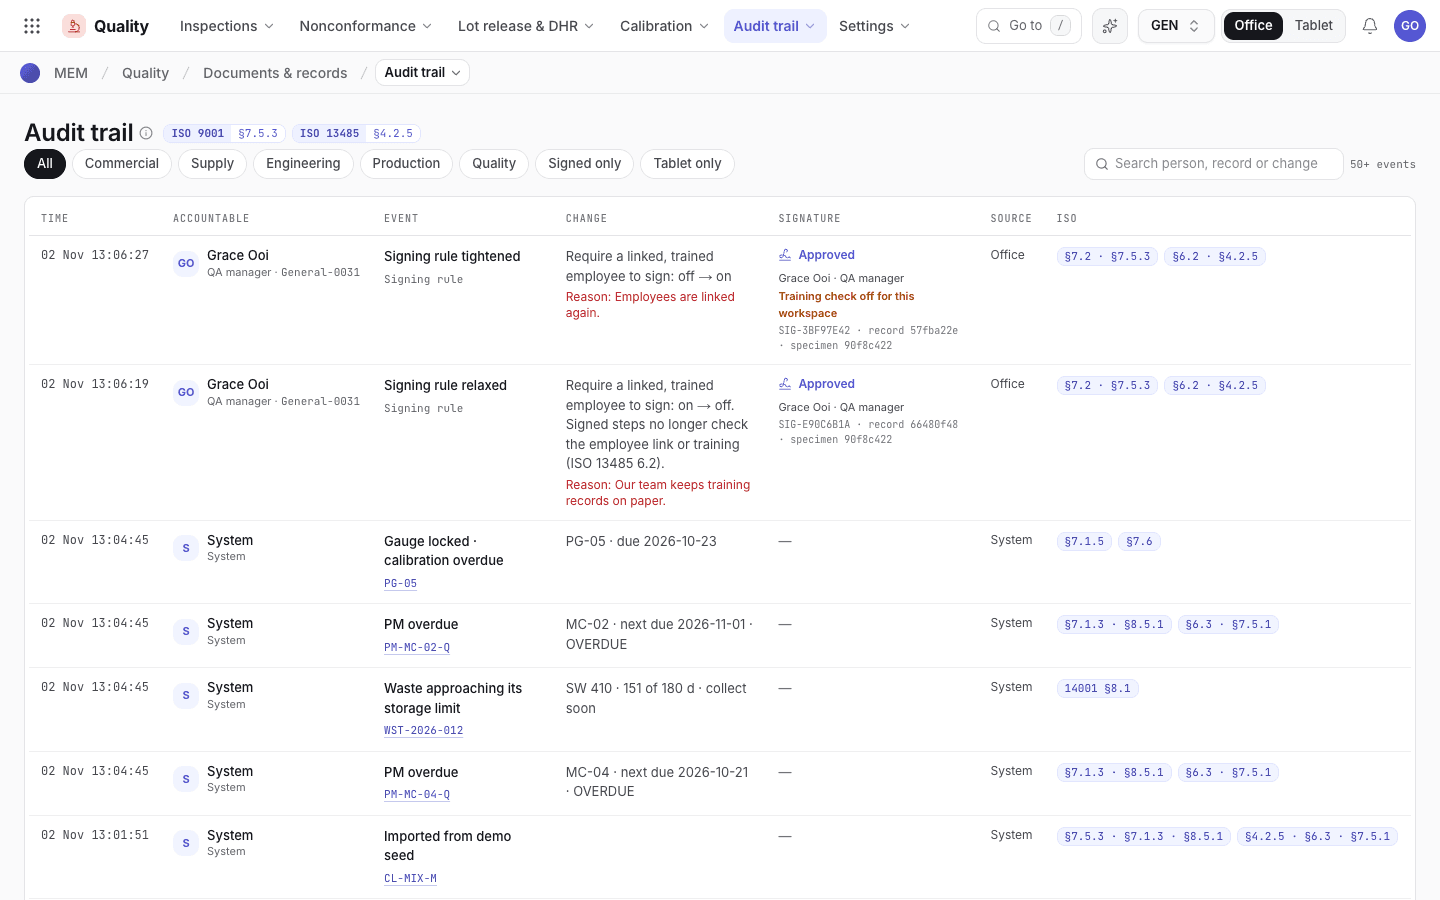
- Signing rule relaxed: on → off, with the reason.
- A signature taken while the check was off says so.
You sign the change under the rule that applies at that time. To turn the check off, your own login must be linked to an active employee with current training. If your login has no employee, link one first in Users & invitations, or ask another Org admin. To turn the check on again, choose the switch, type a reason and choose Sign · turn on.
Set the product release requirements
The product release requirements tell the app what a product must have before you submit, approve or release it. The app also checks the same items before you issue a manufacturing order for the product. The Org admin makes the change. It needs a reason and your e-signature.
| Set | Required items |
|---|---|
| Medical device (default) | All items. Use this set for ISO 13485 work. |
| General manufacturing | BOM, Released production method and At least one machine option. |
| Custom | BOM, Released production method, At least one machine option and the other items that you turn on. |
The items are:
- BOM
- Released production method
- At least one machine option
- Work instruction
- PFMEA with scored lines
- Inspection plan with a CTQ characteristic
- Process validation with an approved protocol
An open High-priority PFMEA line always stops a release and a change, for all sets. Start its action first. The sets change only whether a product must have a PFMEA.
The release row
The set in use and how many items each product needs.

- The set in use: Medical device by default, with the number of required items.
- Change. Only the Org admin can use it.
- An open High-priority PFMEA line always stops a release.
The rules on a phone
The rows stack. Each value and its Change button sit under the text.
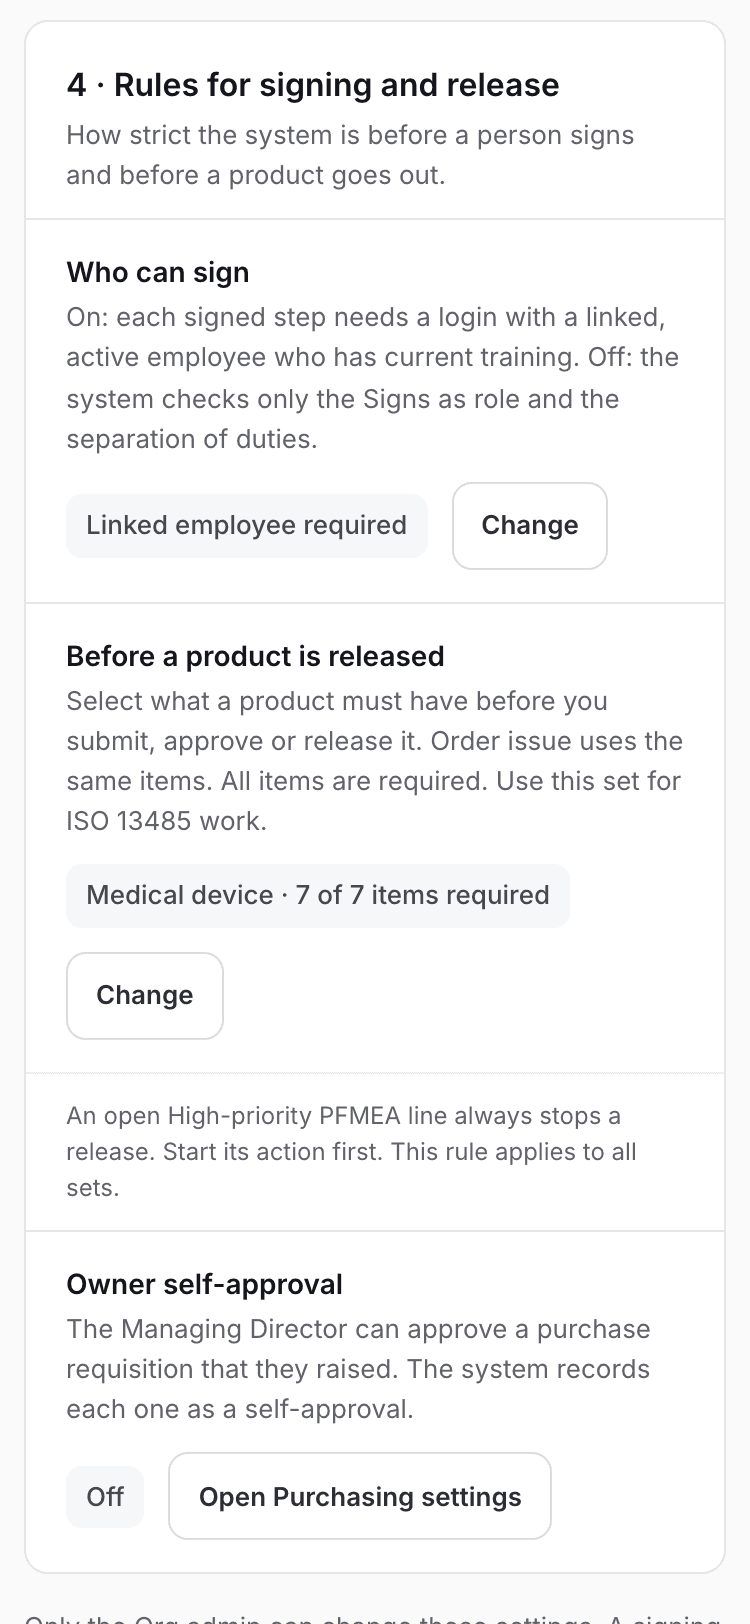
- Change for Who can sign.
- The set and how many items are required.
- Change for the release rules.
Under 4 · Rules for signing and release, find the row Before a product is released. It shows the set and how many items are required. Choose Change.
Select the Requirements set. For Custom, turn on each other item that you require. The first three items are always on.
Read the dialog. If the workspace uses ISO 13485 and you make an item optional, a warning tells you that clause 7.3 controls design outputs and clause 7.5.6 requires validated processes.
Type the Reason for the change (4 characters or more). Then choose Sign · save.
Change the requirements
The set, the items, the ISO 13485 warning, the reason and your signature.
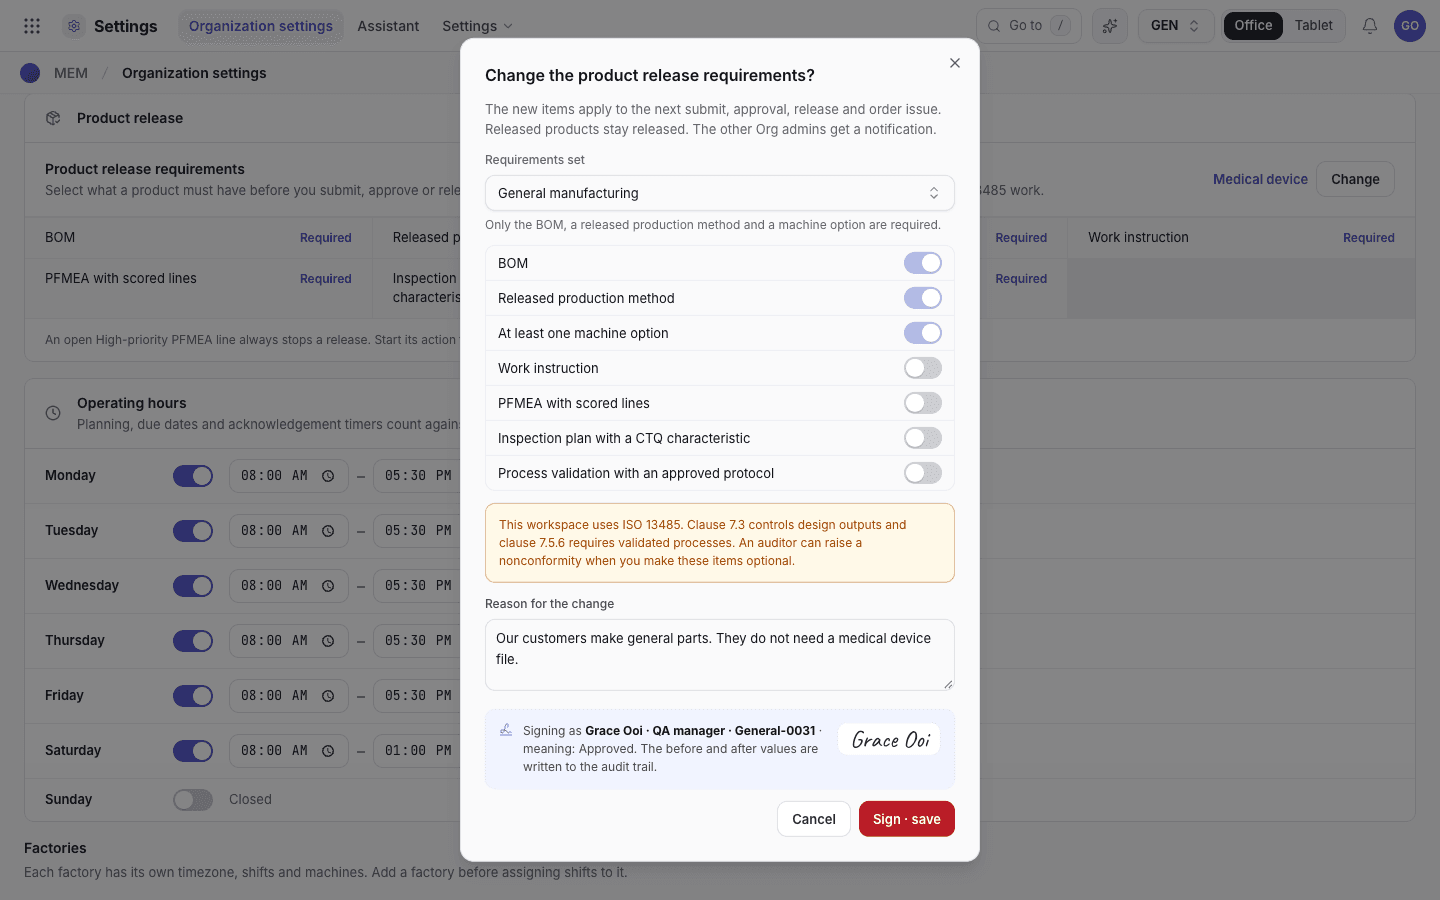
- Requirements set.
- The first three items are always on.
- The other items. Turn them on for Custom.
- ISO 13485 warning: shown when an item becomes optional.
- Reason for the change.
- Sign · save.
The same dialog on a phone
The dialog fills the width of the screen. Scroll down to sign.
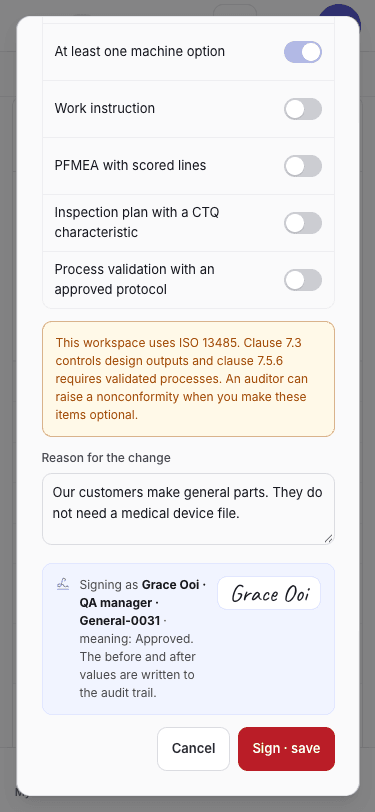
- ISO 13485 warning.
- Reason for the change.
- Sign · save.
When you change the requirements:
- The new items apply to the next submit, approval, release and order issue. Released products stay released.
- A refusal names only the items that the set requires. For example:
Product Prod Test 1 rev 1 cannot be submitted: its medical device file lacks BOM. - When a set does not require all items, the release event of a product names the set, for example
release requirements: General manufacturing (BOM, released production method, machine option). - The other Org admins get a notification. The audit trail keeps the old and the new items, the reason and the signature (Release requirements relaxed or Release requirements changed).
You sign the change under the signing rule that applies at that time. If the rule requires a linked, trained employee, your own login must have one.
Set the process capability rule
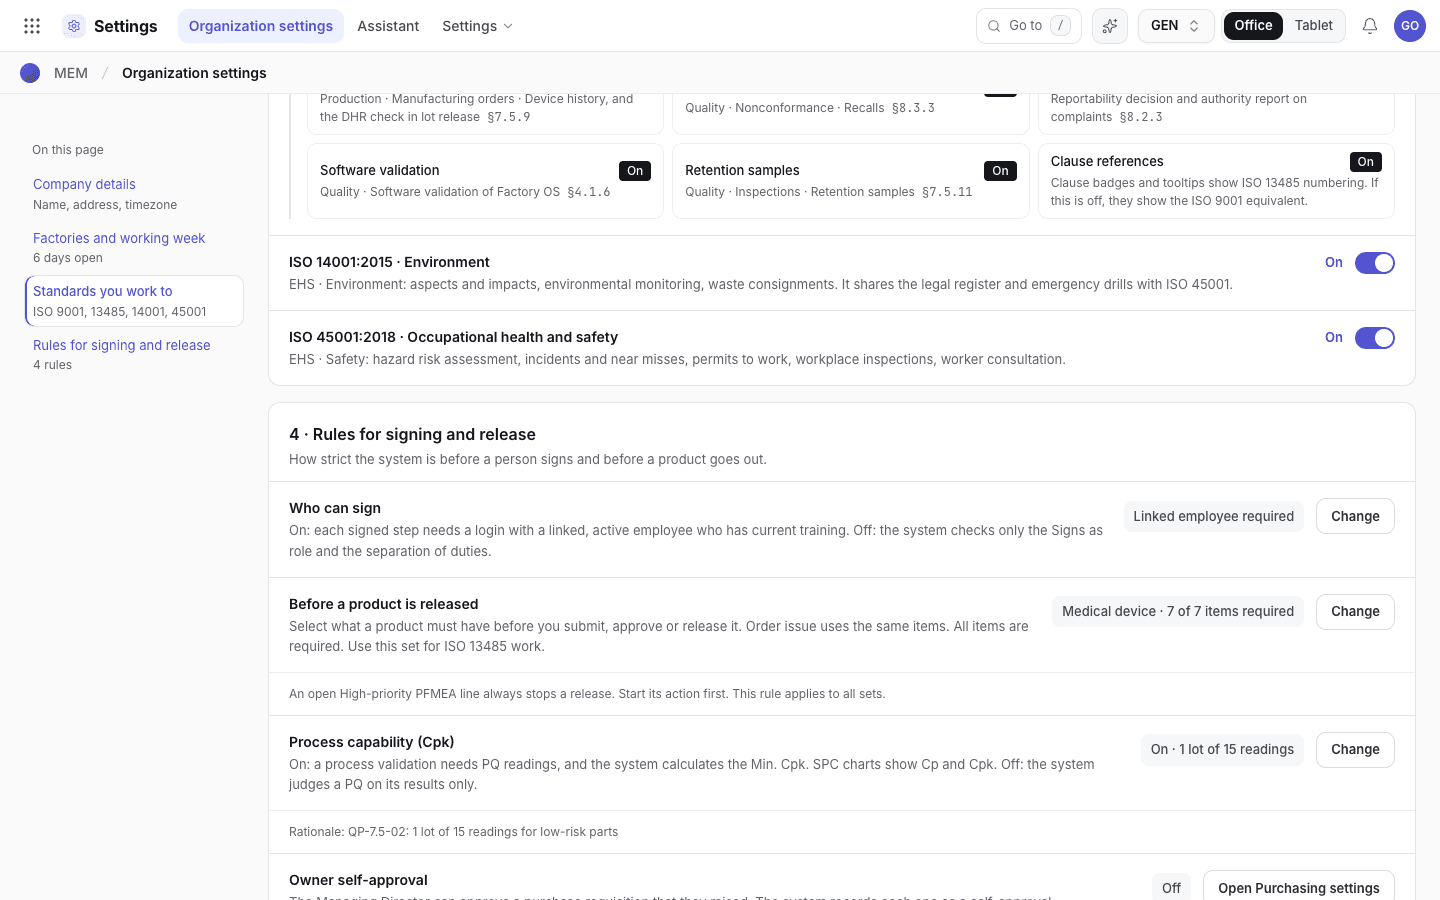
Process capability (Cpk) is the PQ readings and the Min. Cpk of a process validation, and the Cp and Cpk on the SPC charts. The row Process capability (Cpk) in 4 · Rules for signing and release shows if your workspace uses it, and how many lots and readings a PQ needs. The Org admin makes the change. It needs a reason and your e-signature.
| Setting | Default | You can choose |
|---|---|---|
| Process capability | On | On or off |
| Lots per characteristic | 3 | 1 to 5 |
| Readings per lot | 30 | 10 to 100 |
- Off: a process validation with PQ is judged on its results. The validation does not show the PQ readings or the Min. Cpk, and the approval does not ask for a Min. Cpk of 1.33. The SPC charts show the chart and the signals, but no Cp, Cpk or capability by lot.
- Fewer than 3 lots or 30 readings: type the Rationale, for example the procedure that sets the
numbers:
QP-7.5-02: 1 lot of 15 readings for low-risk parts. ISO 13485 7.5.6 asks for a rationale for each sample size. Each validation report shows the numbers and the rationale. - Process capability is an add-on. If it is not part of your plan, the switch is off and you cannot turn it on. Contact VIGOR to add it.
The Process capability row
The rule in use and the rationale for numbers below the default.
- What the setting does.
- The rule in use.
- Change: Org admin only.
- The rationale for numbers below 3 lots of 30.
Change the rule
Choose Change. Set the switch and the numbers, type the rationale and the reason, then sign.
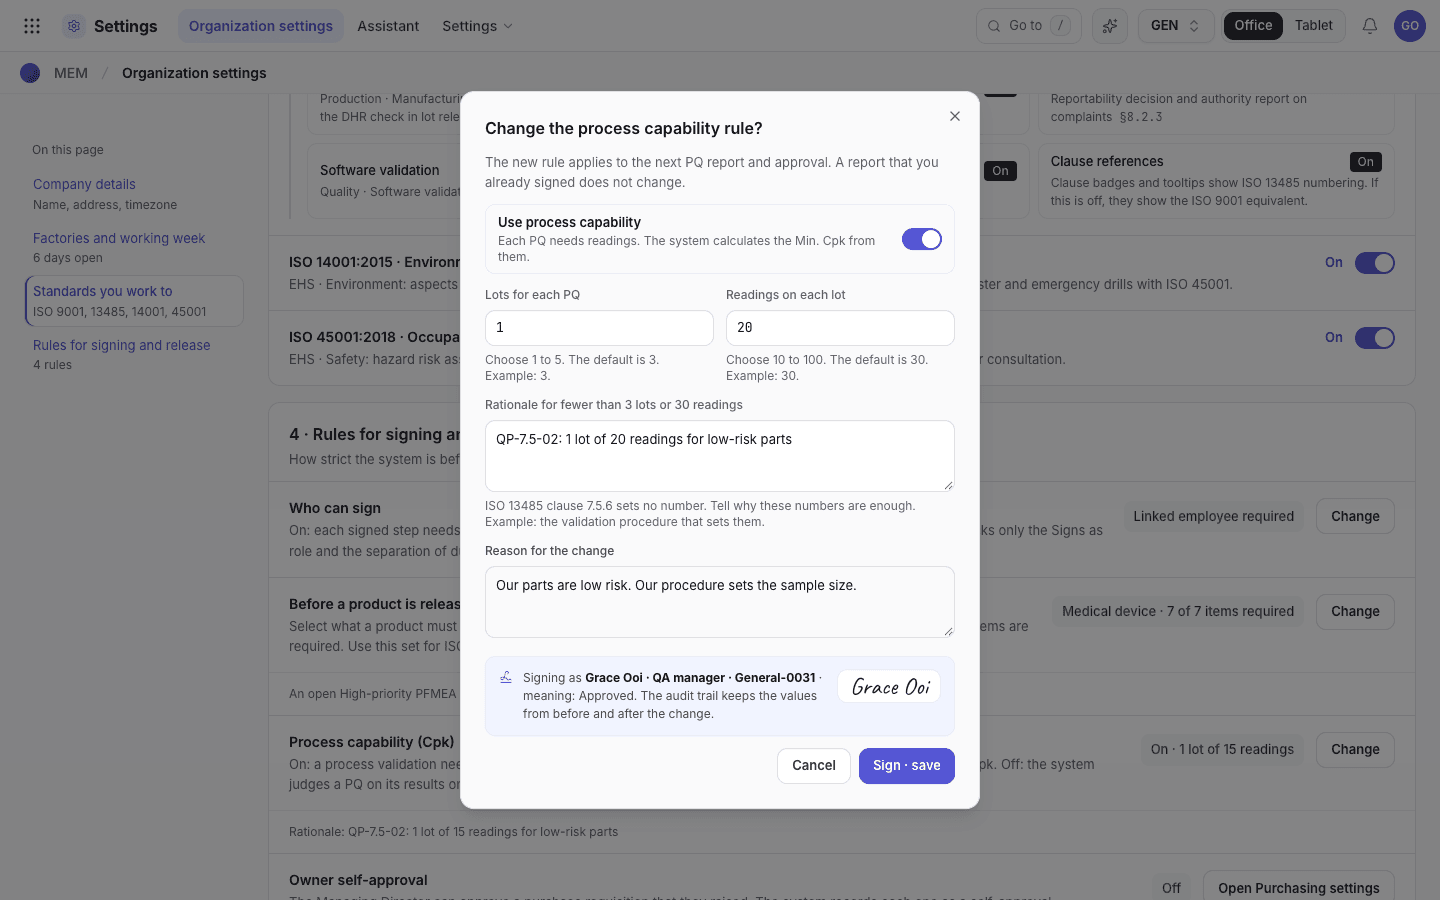
- Use process capability: on or off.
- Lots for each PQ, 1 to 5.
- Readings on each lot, 10 to 100.
- Rationale: needed below 3 lots or 30 readings.
- Reason for the change.
- Sign · save.
When you change the rule:
- The new numbers apply to the next report and approval. Validated validations keep their Min. Cpk.
- The other Org admins get a notification. The audit trail keeps the old and the new rule, the reason and the signature (Process capability relaxed or Process capability changed).
Set the line clearance rule
A line clearance proves that the machine has no parts, labels or material from the last order (ISO 13485 7.5.1 and 7.5.8). The row Line clearance in 4 · Rules for signing and release shows when an order needs one before setup or job start. The Org admin makes the change. It needs a reason and your e-signature.
| Value | What the system does |
|---|---|
| Every order (default) | Each order needs a Verified line clearance for its machine. |
| Only when the product changes | An order needs a clearance unless it is a follow-on run. A follow-on run makes the same product and the same product revision as the last order that ran on that machine. |
| Never | The system does not ask for a clearance. |
- A clearance that someone already started for the order, Open or Cleared, is never ignored. Verify it before the order starts, whatever the value.
- Each machine records what last ran on it: the order, its product and the product revision at that moment. The system writes it when a setup starts, when a paused run resumes and when you move an order onto the machine, and when a traveller check-in scans the order in at a machine station. Only when the product changes compares the order with that record. A follow-on run needs another order of the same product at the same revision as the product has now. A new product revision, a different product or the same order again needs a clearance. Moving an order away does not clear the record of the machine it leaves. An order that already took the machine under this setting does not need a clearance again to start from the phone or to move back to it.
- The record is a change to the machine. If Maintenance edits a machine while a setup starts on it, the save can show that someone else changed the record. Reload the machine and make the edit again.
- A machine with no recorded run yet needs a clearance. This is the case for every machine until the next order is set up on it. If the system does not know the product revision, it asks for a clearance too.
- When the rule lets an order through, the Setup started and Job started events say why:
Line clearance not required: follow-on run of MO-2026-1128, orLine clearance not required: not required by organization setting. An auditor sees the reason on the order. - When the release set is Medical device and the value is not Every order, the row shows a warning. Medical device work normally needs a clearance for every order, and an auditor can raise a nonconformity.
- The other Org admins get a notification. The audit trail keeps the old and the new value, the reason and the signature (Line clearance rule relaxed or Line clearance rule changed).
See the owner self-approval setting
The row Owner self-approval shows if the Managing Director can approve a purchase requisition that they raised. The value reads On or Off. The switch is not on this page. It is in Purchasing > Settings > Approvals, because it belongs to the purchase approval levels. Choose Open Purchasing settings to go there. Only the Org admin can change it. The system records each such approval as a self-approval. Details are in the approval ladder.
Factories and legal entities
Under 2 · Factories and working week, the Factories list shows each factory. Each factory has a Code (assigned on save, for example SITE-02), Factory name, an
optional Internal reference, Timezone, Location and
Status (Active or Inactive). Each factory has its own timezone, shifts and machines, so add a
factory before assigning shifts to it.
Entities & access (/config/tenancy) shows the tenant and deployment, the Legal entities with
ID, Name, Registration, Currency, Tax and Sites, and the approval limits and
delegations (see Invite people). Use + Legal entity to add one.
Run the setup wizard
A new workspace opens the setup wizard at /setup: Company (registered name, registration number,
short name, address, phone, email), Site (standards and working hours) and Team (invite people by
email). Every answer can be changed later on the screens above.
If the system refuses
Every message is in Settings refusals.
| Message | What to do |
|---|---|
Only the Org admin can change the organization details. | Ask the Org admin. |
Only the Org admin can change this setting. | Standards, hours and permissions are Org admin only. |
Organization name is required. | Fill in the name. |
OEE target must be a number up to 100. | Enter a number between 0 and 100. |
Enter a valid email address. | Fix the Email. |
... cannot take signed steps or steps that need training: the login is not linked to an employee. | To turn the signing check off, link your login to an employee first, or ask another Org admin. |
This setting was changed meanwhile. Reload the page and try again. | Another Org admin changed it. Reload the page. |